Per Natale mi sono regalato un kit in MDF tagliato al laser di DarkOps. Il kit in questione è il Large Centre Ruin della linea “Iceheim” (ogni riferimento ai nomi di due popolari giochi ambientati fra le rovine di una città, è puramente casuale ^^).
For Christmas I gifted myself a lasercut MDF kit by DarkOps: the Large Centre Ruin from the “Iceheim” line.


Il kit arriva incellofanato, ed è composto di 5 fogli di MDF, quattro da 3mm di spessore, uno da 2mm (che contiene principalmente le arcate in pietra delle porte).
Non ci sono istruzioni, ma è disponibile un video su YouTube.
The kit comes shrinkwrapped, and consists of 5 MDF sheets, four are 3mm thick, one is 2mm (which mainly contains the stone arches for the doors).
There are no instructions, but there is a video linked from the product page.

Molte parti sono in due metà, e vanno accoppiate e incollate prima di cominciare il montaggio vero e proprio. Questo permette di avere dettagli incisi su entrambe le facciate di un muro, inoltre dona un bel po’ di spessore ai muri stessi.
Many parts are made of two halves, and must be glued together before beginning the actual assembly. This allows to have details engraved on both sides of the walls, but also makes them thicker.

Io ho usato del normalissimo Vinavil. Ho incollato le varie parti e le ho tenute in posizione con delle mollette.
I glued the parts using standard PVA glue, keeping them in place with clamps.

ATTENZIONE: i due pezzi qui sopra NON vanno incollati insieme. Sono i due lati della scalinata e devono rimanere due parti separate: in mezzo ci andranno i gradini.
WARNING: the two pieces above must NOT be glued together. They are the two sides of the staircase and must remain two separate parts: there will be steps in between.

Una volta preparati tutti i pezzi, ho cominciato a montare l’edificio.
Once prepared all the pieces, I began to assemble the building.

Un trucco che ho sviluppato con l’esperienza è quello di limare leggermente gli spigoli degli incastri, per permettere un più agevole inserimento negli slot corrispondenti, che a seconda dei kit e dei produttori possono essere anche parecchio stretti. Non era questo il caso, il modello è stato agevole da costruire, ma ormai è un’abitudine che ho acquisito e quando lavoro con questo materiale lo faccio in automatico.
One trick that I developed with experience is to slightly file the edges of the joints, to allow easier insertion into the corresponding slots. Depending on kits and manufacturers fitting can be quite tight. This was not the case, the model is easy to build, but it’s a habit I acquired and when working with MDF I do this by default.

Operazione simile, ma per scopo diverso: ho limato molti degli spigoli dei pezzi di modello, creando anche indentature a simulare danni. Questo perché l’MDF è tagliato dal laser in maniera perpendicolare e ha, rispetto al taglio, angoli vivi di 90° molto precisi, fatto che rende tutta la struttura un po’ “finta”. Arrotondando e danneggiando questi spigoli, si da al tutto un aspetto meno artificioso e più “tridimensionale”.
In a similar way, but for a different purpose, I filed many of the edges of the model pieces, even creating indentations to simulate damage. This because the MDF is cut by the laser with sharp and exact 90° angles, which makes the whole structure look somewhat “unrealistic”. Rounding and damaging these edges makes the whole model more “three-dimensional”, it gives a less artificial look.
Qui di seguito, l’edificio completamente assemblato:
Below, the fully assembled building:


Il kit di suo è davvero pregevole, ma io ho dovuto comunque apportare qualche piccola miglioria su un paio di particolari che non mi piacevano molto:
This is a great kit, rich in details, but I still had to make some small improvements in a couple places where I felt it needed them:
La porta qui sopra dava completamente sul vuoto. Possibile in una rovina antica e molto danneggiata come questa. Ma visto che una buona parte di pavimentazione era comunque presente, ho voluto aggiungerne un ultimo residuo anche qui. Presto fatto: con una striscia di MDF di scarto, cutter e lima è stato un attimo.
The door above gave completely into the void. Nothing strange in an ancient and very damaged ruin like this. But since a few good portions of planking are still present, I wanted to add a last remnant here, too. Easily done: with a strip of MDF frame, sharp knife and file.

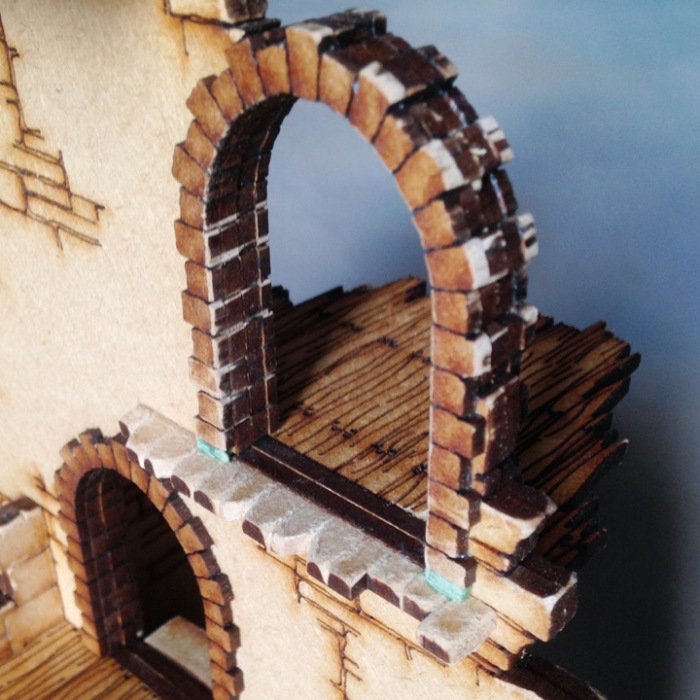
L’arco di pietra che incornicia la porta che da sui gradini era uguale a tutti gli altri e terminava in basso con una pietra piatta che faceva sembrare questa cornice a mezz’aria un po’ “non finita”. Anche in questo caso è stato semplice e veloce creare con un po’ di materiale di scarto due pietre da aggiungere sotto che “chiudessero” con un po’ più di eleganza l’arco della porta.
In questa foto si vede bene anche il lavoro di levigatura e danneggiamento sui gradini.
The stone arch that frames the staircase door was the same as every other else and ended at the bottom with flat stones that made it seem somewhat “unfinished”. In this case, too, it has been simple and fast to use a bit of leftover MDF to create two stones to be added below to more gently “close” the stone frame of this door.
This photo also shows well the smoothing and damage work on the steps.
Al di la delle mie piccole aggiustatine, questo è un kit davvero superbo, per 25 sterline si ottiene un modello davvero grande, con tre piani rialzati (uno minuscolo, ma due piuttosto ampi), ottimo per Frostgrave o Mordheim, ma utilizzabile con moltissimi altri giochi, soprattutto se gestiscono l’elevazione. Malifaux, ad esempio.
Per quanto mi riguarda, consiglio questo kit senza riserve, e visto il rapporto prezzo, facilità di montaggio, e qualità del risultato, è molto probabile che ne compri altri in futuro.
Notwithstanding my small modifications, this is a really superb kit, for £25 you get a quite large model, three storeys tall, great for both Frostgrave and Mordheim, but usable with many other games, especially if they handle elevation. Malifaux, for example.
Honestly, I could not recommend this kit more. Given the cost, ease of assembly, and quality of the result, it is very likely that I’ll buy more in the future.
Link: https://darkops.myshopify.com/products/28mm-iceheim-large-centre-ruin

Nice work on the assembly here. Iceheim, eh? I think that’s just down the road from Mordgrave?